Refrigerator Defrost Troubleshooting (Complete Guide)
Freezing Up? Your Complete Guide to Refrigerator Defrost Troubleshooting
There’s nothing quite as frustrating as opening your freezer door only to be greeted by a winter wonderland of ice where your frozen peas should be. Or worse, finding your refrigerator section suspiciously warm despite a perfectly functioning freezer. Chances are, your refrigerator's defrost system is on the fritz. But don't despair! This comprehensive guide will walk you through the common culprits and how to troubleshoot them, potentially saving you a costly service call.
Your refrigerator's defrost system is a crucial, often overlooked, part of its operation. It periodically melts away the ice that naturally builds up on the evaporator coils, ensuring efficient cooling and preventing excessive frost that can block airflow and reduce performance. When this system fails, it can lead to a host of problems, from poor cooling to higher energy bills.
How Your Refrigerator's Defrost System Works
To understand how to fix it, it helps to know how it works. Most modern refrigerators use a cyclical defrost system, typically consisting of three main components:
- Defrost Timer or Control Board: Initiates and terminates the defrost cycle.
- Defrost Heater: Melts the ice off the evaporator coils.
- Defrost Thermostat (or Thermistor): A safety switch that prevents the heater from overheating the freezer compartment, turning it off once the ice is melted.
During the defrost cycle, the compressor and fans briefly shut off, and the heater warms up to melt the ice. The melted water then drains away through a tube to an evaporation pan beneath the fridge. Once the thermostat senses the ice is gone (or the timer runs out), the heater turns off, and normal cooling resumes.
Common Symptoms of Defrost System Failure
Recognizing the symptoms is the first step toward diagnosis. If you're experiencing any of the following, your defrost system might be the problem:
- Excessive Frost Buildup: Heavy ice accumulation on the back wall of the freezer or around the evaporator coils.
- Refrigerator Section Not Cooling: The freezer might be cold, but the fridge compartment is warm because blocked airflow prevents cold air from circulating.
- Compressor Running Constantly: The fridge works harder to maintain temperature due to inefficiency.
- Water Leaks: Melted ice can't drain properly and overflows, leading to puddles inside or outside the fridge.
- Strange Noises: An evaporator fan hitting built-up ice can create a loud, grinding noise.
Step-by-Step Defrost System Troubleshooting
Before you begin, remember: safety first! Always unplug your refrigerator before attempting any inspection or repair.
1. Visual Inspection & Manual Defrost
Start by opening your freezer and removing any shelves or drawers to get a clear view of the back panel. If you see a thick layer of frost, especially on the back wall or covering the fan, your defrost system isn't working.
A quick, temporary fix can be to manually defrost the refrigerator. Unplug it, leave the doors open, and let all the ice melt (this can take 24-48 hours). Place towels down to catch water. If the fridge works normally for a few days or weeks afterward before frosting up again, it strongly indicates a defrost system component failure.
2. The Defrost Timer (or Main Control Board)
The defrost timer is often the easiest component to check. It's usually located behind the kick plate at the bottom front of the refrigerator, inside the control panel on top, or sometimes even in the fresh food compartment.
How to Test:
- Locate the timer.
- Using a flathead screwdriver, manually advance the timer's gear clockwise until you hear a click. This should initiate the defrost cycle, turning off the compressor and fans.
- Wait about 20-30 minutes. You should hear the compressor kick back on. If it does, the timer might be working, and another component is likely faulty. If the compressor doesn't turn back on, the timer might be stuck in defrost mode. If it never entered defrost mode with the click, it's likely faulty.
If your refrigerator uses an electronic control board instead of a mechanical timer, diagnostics can be more complex and often require professional assistance or replacement of the entire board if internal relays fail.
3. The Defrost Heater
The defrost heater is typically located underneath the evaporator coils in the freezer compartment, often protected by a metal shield or foil. Its job is to heat up and melt the ice.
How to Test (Requires a Multimeter):
- Access the evaporator coils (you'll need to remove the back panel of the freezer).
- Locate the defrost heater (it often looks like a glass tube or a metal rod).
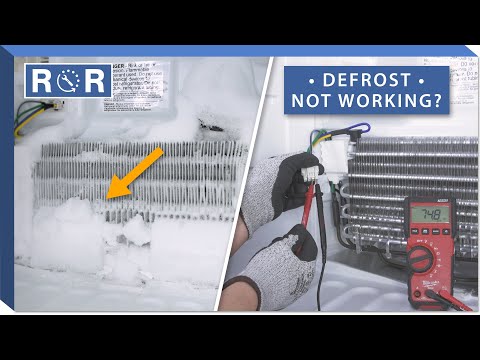
- Disconnect the heater's wires and use a multimeter set to measure continuity (ohms).
- Place the multimeter probes on the heater's terminals. A reading of infinity (open circuit) or no continuity indicates a faulty heater that needs replacement. A proper reading will show continuity, usually between 10-50 ohms, depending on the model.
For a visual demonstration of accessing and testing these components, we highly recommend watching this helpful video: Refrigerator Troubleshooting - Not Defrosting. It provides excellent guidance on identifying and testing the defrost heater, thermostat, and timer.
4. The Defrost Thermostat (Bimetal Thermostat or Limit Switch)
The defrost thermostat, also known as a bimetal thermostat or limit switch, is a safety device clipped directly onto one of the evaporator coils. It closes (allows current to flow to the heater) when the coil temperature drops below a certain point (e.g., 10-20°F) and opens (breaks the circuit) when the temperature rises (e.g., above 30-40°F), preventing the heater from running too long.
How to Test (Requires a Multimeter and Ice Water):
- Locate the thermostat, usually clipped to the top of the evaporator coil.
- Disconnect its wires.
- At room temperature, the thermostat should show an open circuit (no continuity) with a multimeter.
- Place the thermostat in a cup of ice water for several minutes to get it below its activation temperature.
- While still cold, re-test with the multimeter. It should now show continuity (a closed circuit). If it doesn't, the thermostat is faulty.
Some newer refrigerators use a thermistor instead of a bimetal thermostat. A thermistor's resistance changes with temperature. Testing it requires a multimeter and a chart specific to your model to compare resistance readings at different temperatures. The video referenced above also shows how to locate and test the defrost thermostat.
5. The Evaporator Fan Motor
While not part of the defrost *system* itself, a faulty evaporator fan motor can mimic defrost issues. If the fan isn't circulating cold air from the evaporator coils into the freezer and fridge compartments, the freezer might still get cold, but the fridge won't, and ice might build up around the coils due to stagnant air. Check if the fan spins freely and quietly when the freezer door is closed (some models have a door switch that turns it off when open).
6. Clogged Defrost Drain
If the defrost system is working but you're still seeing water leaks or ice buildup at the bottom of the freezer, the drain tube might be clogged. The melted ice needs somewhere to go!
How to Clear:
- Locate the drain hole under the evaporator coils (you may need to remove the back panel).
- Use a turkey baster or syringe to flush hot water down the drain. You can also carefully use a pipe cleaner or a thin wire to clear any obstructions.
- Ensure the water flows freely into the drain pan beneath the refrigerator.
When to Call a Professional
While many defrost system issues can be DIY-fixed, don't hesitate to call a certified appliance technician if:
- You're uncomfortable working with electrical components.
- You can't pinpoint the exact cause after troubleshooting.
- Your refrigerator has a complex electronic control board that requires specialized diagnostic tools.
- You've replaced components, but the problem persists.
Preventative Maintenance Tips
To keep your defrost system (and entire refrigerator) running smoothly:
- Don't Overload: Ensure proper airflow around items in the freezer.
- Check Door Seals: Damaged seals let warm, moist air in, leading to excessive frost.
- Clean Coils: Dust and debris on condenser coils can make the fridge work harder.
- Regularly Inspect: Keep an eye out for early signs of frost buildup.
Get Your Fridge Back in Working Order!
A functioning defrost system is key to an efficient, long-lasting refrigerator. By understanding its components and knowing how to troubleshoot common issues, you can often bring your appliance back from the brink of a frozen disaster. If you've identified a faulty part, we have a wide selection of high-quality replacement parts for all major refrigerator brands. Don't let ice take over – get the parts you need today and restore your fridge's optimal performance!