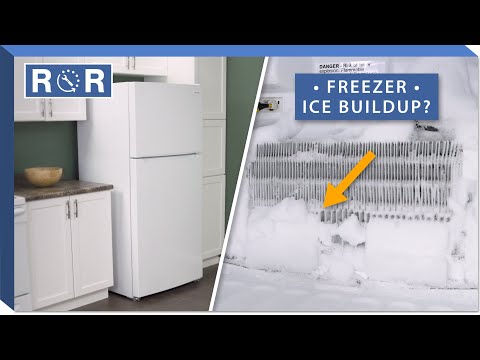
Frost & Ice Buildup? Freezer Ice Removal
Battling the Ice Monster: Your Guide to Freezer Frost Removal & Prevention
There's nothing quite as frustrating as opening your freezer door only to be greeted by a winter wonderland – and not the good kind. A thick layer of frost and ice buildup doesn't just look unsightly; it can significantly impact your freezer's efficiency, reduce storage space, and even affect the quality of your frozen foods. But fear not! Tackling freezer ice is a manageable task, and we're here to guide you through the process, from safe removal to preventing its return.
Why Does Frost and Ice Build Up in Your Freezer?
Before we dive into removal, let's understand the enemy. Frost forms when moist air comes into contact with the cold surfaces inside your freezer. The moisture freezes, creating those icy layers. Common culprits include:
- Frequent Door Openings: Each time you open the freezer door, warmer, humid air from your kitchen rushes in.
- Poor Door Seals (Gaskets): A damaged or dirty door seal allows warm air to constantly seep into the freezer.
- Storing Warm Food: Placing hot or even warm food directly into the freezer introduces a lot of moisture.
- Uncovered Food: Food stored without airtight lids releases moisture into the freezer's atmosphere.
- High Humidity: If you live in a humid climate, your freezer is working harder to keep moisture out.
- Overpacking or Underpacking: Both can impede proper air circulation, leading to temperature inconsistencies and frost.
Is Freezer Frost Really a Problem?
Absolutely! Beyond taking up valuable space, excessive ice buildup can:
- Decrease Efficiency: Your freezer has to work much harder (and use more energy) to maintain its temperature, leading to higher electricity bills.
- Reduce Cooling Performance: Ice can insulate the evaporator coils, preventing the freezer from cooling effectively.
- Damage Food: Inconsistent temperatures can lead to freezer burn and spoilage.
- Obstruct Drawers and Shelves: Making it difficult to access your frozen items.
How to Safely Defrost Your Freezer: A Step-by-Step Guide
Ready to reclaim your freezer space? Here’s how to safely remove that stubborn ice:
Step 1: Preparation is Key
First and foremost, safety! Unplug your freezer from the power outlet. This is crucial to prevent electric shock and ensure the defrosting process starts. Next, empty your freezer. Transfer all frozen food to a cooler with ice packs or into a working refrigerator/freezer if you have one. Lay down old towels or newspapers around the base of the freezer to catch melting water.
Step 2: Let the Melting Begin
The simplest method is to open the freezer door and let nature take its course. However, if you're short on time, you can speed things up:
- Hot Water Bowls: Place bowls of hot (not boiling) water inside the freezer and close the door for 15-20 minutes. The steam will help loosen the ice.
- Fan Power: Point a fan directly into the open freezer compartment. The circulating air, even if it's room temperature, will accelerate melting.
- Plastic Scraper: As the ice softens, you can gently chip away at it with a plastic scraper or spatula. NEVER use sharp objects like knives or ice picks, as you could puncture the freezer lining or damage cooling coils, leading to costly repairs.
- Avoid Heat Guns or Hair Dryers: While tempting, these can damage the plastic interior of your freezer.
For a visual walkthrough of preparing your freezer and safely removing ice, this video provides excellent guidance: Freezer Ice Removal Video.
Step 3: Clean and Dry
Once all the ice has melted, wipe down the interior of your freezer with a clean cloth and a mild solution of baking soda and water. This helps remove any lingering odors and sanitize the space. Ensure the interior is completely dry before proceeding to the next step.
Step 4: Power Up and Restock
Plug your freezer back in and allow it to cool down to your desired temperature for a few hours before returning your frozen food. This ensures your food refreezes safely and efficiently.
Preventing Future Frost Buildup
An ounce of prevention is worth a pound of defrosting! Here’s how to keep that ice monster at bay:
- Check Your Door Seal (Gasket): Regularly inspect the rubber seal around your freezer door. If it's cracked, torn, or no longer sealing properly, replace it. You can test it by closing the door on a dollar bill; if you can pull the bill out easily, the seal is weak.
- Don't Overfill or Underfill: A freezer that's too full can block airflow, while one that's nearly empty has more air to cool, allowing moisture to condense. Aim for a relatively full but not jam-packed freezer.
- Store Food Properly: Use airtight containers or freezer bags to store food. This prevents moisture from escaping food and condensing into frost.
- Cool Food Before Freezing: Allow hot food to cool completely to room temperature before placing it in the freezer.
- Limit Door Openings: Try to be quick when retrieving items from the freezer to minimize the amount of warm, humid air entering.
- Set the Right Temperature: Most freezers operate optimally between 0°F (-18°C) and -10°F (-23°C). Extremely low temperatures can sometimes encourage more frost if not properly managed.
When to Call a Professional
If you find that your freezer is frosting up excessively and rapidly, even after following these prevention tips, there might be a more significant issue at play. Problems with the defrost timer, defrost heater, or thermostat could be the cause. In such cases, it's best to consult an appliance repair professional. They can diagnose the problem and replace any faulty parts, ensuring your freezer runs efficiently and frost-free.
A well-maintained, frost-free freezer is more energy-efficient, keeps your food fresher, and offers more usable storage space. By following these steps, you can banish the ice monster and enjoy a smoothly running appliance for years to come!