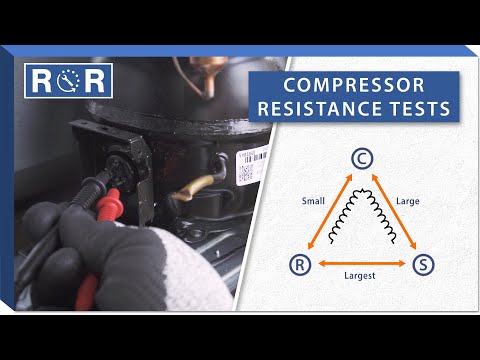
Refrigerator Compressor Resistance Test
Unlocking the Mystery: How to Perform a Refrigerator Compressor Resistance Test
Is your refrigerator struggling to keep things cold? Perhaps it's making unusual noises, or worse, no noise at all? A faulty compressor is often the culprit behind these frustrating issues. While replacing a compressor is a job usually best left to professionals, understanding how to test its electrical resistance can help you accurately diagnose the problem and save time and money on unnecessary repairs. This guide will walk you through the process of performing a refrigerator compressor resistance test, empowering you with valuable diagnostic skills.
What Does Your Refrigerator Compressor Do?
At the heart of your refrigerator's cooling system lies the compressor. This vital component acts as the pump, circulating refrigerant through the sealed system. It compresses the gaseous refrigerant, raising its temperature and pressure, before sending it to the condenser coils where it dissipates heat. Without a functional compressor, your refrigerator simply cannot cool, turning it into an expensive, oversized cupboard.
Why Is a Compressor Resistance Test Important?
When your refrigerator stops cooling, several components could be at fault. The compressor, however, is one of the most critical and expensive parts. Before jumping to conclusions or calling a technician, a resistance test can confirm whether the compressor's internal windings are electrically sound. This test helps identify issues like open circuits, short circuits, or a grounded winding, all of which indicate a faulty compressor that needs replacement. It's a precise way to diagnose a common problem without guesswork.
Tools You'll Need for the Test
To perform an accurate compressor resistance test, gather the following tools:
- Multimeter: An essential tool capable of measuring resistance (Ohms). Make sure it's set to the lowest Ohm (Ω) setting, usually 200 or 2K.
- Screwdriver Set: For removing access panels and components.
- Needle-Nose Pliers: Can be helpful for disconnecting wires.
- Work Gloves: For safety and protection.
- Camera/Smartphone: To take pictures of wire connections before disconnecting, ensuring correct reassembly.
Safety First: Before You Begin
Working with electrical appliances can be dangerous. Always prioritize safety:
- Unplug the Refrigerator: This is the most crucial step. Ensure the appliance is completely disconnected from its power source before touching any internal components.
- Wear Protective Gear: Use work gloves to protect your hands.
- Discharge Capacitors (if applicable): While less common for compressors directly, some models might have start capacitors. Be aware of electrical stored energy if you encounter them, though for this specific test, direct capacitor discharge isn't usually required at the compressor terminals themselves.
Understanding Your Compressor's Terminals
Before testing, you need to locate and understand the compressor's electrical terminals. These are typically found on the side of the compressor, usually covered by a terminal box or cover. Once exposed, you'll generally see three pins arranged in a triangular pattern. These represent:
- Common (C): The shared electrical connection.
- Start (S): The winding responsible for initiating the compressor's motor.
- Run (R): The winding that keeps the compressor motor operating after startup.
Often, these terminals are not explicitly labeled, but you can usually identify them by their position or by referencing your refrigerator's wiring diagram. For a great visual guide on identifying these terminals and understanding the process, check out this helpful video: Refrigerator Compressor Test by AppliancePartsPros.com.
Step-by-Step: Performing the Resistance Test
With safety measures in place and your tools ready, follow these steps:
1. Access the Compressor
Move your refrigerator away from the wall. Locate the compressor, usually at the bottom rear of the unit. You may need to remove a metal or cardboard access panel held by screws.
2. Remove the Compressor Relay and Overload Protector
The compressor's electrical terminals will have a small plastic or metal component attached to them. This is typically the start relay (also called a PTC relay or start device) and the overload protector (OLP). Carefully pull these components straight off the terminals. Take a photo of their orientation before removal if you're unsure.
3. Identify the Terminals
As discussed, identify the Common (C), Start (S), and Run (R) terminals. If they aren't labeled, use the visual cues from your wiring diagram or the linked video.
4. Set Your Multimeter
Turn on your multimeter and set it to the lowest Ohm (Ω) setting (e.g., 200Ω or 2KΩ). Touch the two probes together; the reading should be very close to zero, indicating a good connection.
5. Perform the Winding Resistance Tests
Place one multimeter probe firmly on one terminal and the other probe on a second terminal. Record the readings for all three combinations:
- Common (C) to Run (R): Record this value.
- Common (C) to Start (S): Record this value.
- Run (R) to Start (S): Record this value.
Ensure a good connection between the probes and the clean metal pins of the compressor terminals. If the pins are dirty or corroded, clean them first with fine-grit sandpaper or an emery board.
6. Perform the Terminal-to-Ground Test
This test checks for a short circuit to the compressor's metal casing (ground). Place one multimeter probe firmly on any of the compressor terminals (C, S, or R) and the other probe firmly on a clean, unpainted metal part of the compressor's body. Repeat this for all three terminals. The reading should be "OL" (open loop) or infinity, indicating no continuity.
Interpreting Your Multimeter Readings
What Are Good Readings?
A healthy compressor will exhibit specific resistance values. While exact numbers vary by model, the general rules are:
- Common to Run (C-R) will have the lowest resistance.
- Common to Start (C-S) will have a higher resistance than C-R.
- Run to Start (R-S) should be approximately the sum of C-R and C-S. For example, if C-R = 5Ω and C-S = 10Ω, then R-S should be around 15Ω.
- Terminal to Ground Test: The multimeter should read "OL" (Open Loop) or infinity, indicating no continuity between the terminals and the compressor casing.
Always consult your refrigerator's service manual or wiring diagram for precise resistance values for your specific compressor model if available. However, the relationships between the readings (C-R < C-S, and C-R + C-S ≈ R-S) are universal indicators of a good winding.
What Indicates a Problem?
Abnormal readings point to a faulty compressor:
- Open Circuit ("OL" or Infinity): If any of the C-R, C-S, or R-S tests show "OL" or infinity (a very high resistance), it means there's a break in the internal winding. The compressor is bad.
- Short Circuit (Zero or Very Low Resistance): If any of the C-R, C-S, or R-S tests show zero or an extremely low resistance (much lower than expected), it indicates a short circuit within the winding. The compressor is bad.
- Grounded Winding (Continuity to Ground): If the terminal-to-ground test shows any resistance reading other than "OL" or infinity, it means one of the windings is shorted to the compressor's metal casing. The compressor is bad.
What to Do if Your Compressor is Faulty
If your resistance tests confirm a faulty compressor, you generally have two options:
- Professional Repair: Replacing a refrigerator compressor is a complex task that involves recovering refrigerant, brazing new lines, and recharging the system. These steps require specialized tools, training, and often, EPA certification. It's highly recommended to call a qualified appliance repair technician.
- Appliance Replacement: Depending on the age and value of your refrigerator, replacing the entire unit might be more cost-effective than a compressor replacement, which can be quite expensive.
Remember to reassemble everything exactly as it was, ensuring the start relay and overload protector are correctly attached before plugging the refrigerator back in.
Conclusion: Empowering Your Appliance Repair Skills
Performing a refrigerator compressor resistance test is a powerful diagnostic skill that can save you time, money, and frustration. By carefully following these steps and interpreting the results, you can accurately determine if your compressor is the source of your refrigerator's cooling problems. While the repair itself often requires professional help, diagnosing the issue yourself is a significant step towards efficient appliance maintenance. Keep your multimeter handy, and you'll be well-equipped to tackle future appliance challenges!