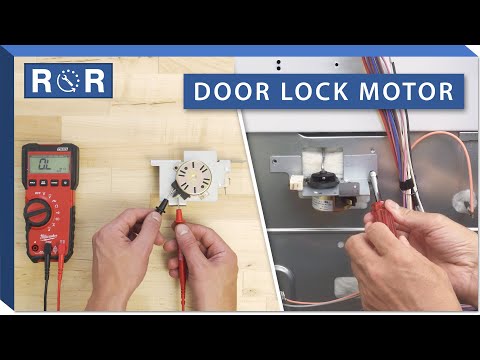
Oven Door Lock Motor - Testing & Replacement
The self-cleaning feature on your oven is a true convenience, but when it doesn't work – or worse, when your oven door gets stuck locked – the culprit is often the oven door lock motor. This small but mighty component is essential for both the safety and functionality of modern ovens. If you're facing issues with your oven door locking or unlocking, don't rush to call a technician just yet! With a few basic tools and a bit of guidance, you can often test and replace this part yourself.
Understanding Your Oven Door Lock Motor
The oven door lock motor, sometimes called a door latch motor or lock assembly, is responsible for securing the oven door. Its primary function is to engage a locking mechanism during high-temperature operations, like the self-cleaning cycle, preventing the door from being opened. This is a crucial safety feature, as the temperatures reached during self-cleaning can be extremely dangerous. It also ensures the oven maintains its high heat efficiently. When this motor malfunctions, your oven might refuse to start a self-clean cycle, display an error code, or leave your door stubbornly locked or unlocked.
Common Symptoms of a Failing Oven Door Lock Motor
Identifying the signs of a faulty door lock motor is the first step towards a solution. Here are the most common indicators:
- Oven Door Won't Lock: You try to start a self-clean cycle, but the door fails to lock, and the cycle won't initiate.
- Oven Door Won't Unlock: After a self-clean cycle, the door remains stubbornly locked, preventing you from using your oven.
- Error Codes: Your oven display might show specific error codes related to the door latch or lock mechanism (e.g., F9, F90, E0 F9, depending on the brand).
- Unusual Noises: You might hear grinding, buzzing, or clicking sounds when the oven attempts to lock or unlock the door, but nothing happens.
- Intermittent Locking Issues: The door might lock sometimes but not others, indicating an inconsistent electrical connection or a motor on its way out.
Safety First: Before You Begin
Working with any appliance requires strict adherence to safety protocols. Your oven deals with high voltage and heat, so always prioritize your safety. Before you touch any internal components:
- Unplug the Oven: Locate the oven's power cord and unplug it from the wall outlet. If it's hardwired, switch off the corresponding circuit breaker in your home's electrical panel.
- Allow Cooling: Ensure the oven is completely cool to the touch, especially if it has recently been used or attempted a self-clean cycle.
- Wear Protective Gear: Gloves can protect your hands from sharp edges and grime.
Tools You'll Need
Gathering your tools beforehand will make the process smoother:
- Screwdriver set (Phillips and flathead)
- Nut driver set (various sizes, typically 1/4" or 5/16")
- Multimeter (for testing electrical continuity)
- Pliers (needle-nose may be helpful)
- Work light or flashlight
- New oven door lock motor (ensure it's compatible with your oven model)
Testing Your Oven Door Lock Motor
Before replacing the motor, it's wise to test it to confirm it's the source of the problem. This saves time and ensures you're replacing the correct part.
Step 1: Disconnect Power and Access the Motor
With the power disconnected, you'll need to gain access to the door lock motor. This usually involves removing the oven's back panel, top panel, or sometimes the control panel, depending on your oven's make and model. Carefully remove any screws holding these panels in place and set them aside.
Step 2: Perform a Visual Inspection
Once you locate the door lock motor assembly, give it a thorough visual inspection. Look for:
- Burnt or melted wires.
- Loose or corroded electrical connections.
- Physical damage to the motor housing or gears.
- Any obstructions preventing the latch mechanism from moving freely.
Step 3: Test for Electrical Continuity
This step requires a multimeter. The goal is to check if the motor itself has an open circuit, indicating it's no longer receiving power or has an internal break.
- Carefully disconnect the wiring harness leading to the door lock motor. Note how the wires are connected, or take a picture for reassembly.
- Set your multimeter to the "Ohms" (Ω) or continuity setting.
- Place one probe on each terminal of the door lock motor.
- A working motor should show a specific resistance reading (refer to your oven's service manual if available for exact values) or indicate continuity (often a beep on most multimeters). If your multimeter shows "OL" (Over Limit) or no reading at all, it indicates an open circuit, meaning the motor is faulty and needs replacement.
For a detailed visual walkthrough on accessing and testing your oven's door lock motor and other components, you might find this video helpful: Oven Door Lock Motor Testing & Replacement Guide.
Replacing Your Oven Door Lock Motor
If your tests confirm the motor is faulty, it's time for replacement. The process is generally straightforward and involves reversing the steps you took to access it.
Step 1: Disconnect and Remove the Old Motor
With the power still disconnected and the motor exposed:
- Double-check that all wiring harnesses are detached from the old motor.
- Locate the screws or clips holding the motor assembly in place.
- Carefully remove these fasteners and gently pull the old motor assembly out. Be mindful of any linkages or rods connected to the door latch mechanism. You might need to detach these from the motor.
Step 2: Install the New Oven Door Lock Motor
Now, install your new, compatible oven door lock motor:
- Position the new motor in the same orientation as the old one.
- Attach any linkages or rods from the door latch mechanism to the new motor.
- Secure the motor assembly with the screws or clips you removed earlier.
- Reconnect the wiring harness to the new motor, ensuring all connections are snug and correctly placed (refer to your photo if you took one).
The aforementioned video, Oven Door Lock Motor Testing & Replacement Guide, also provides excellent visual steps for the replacement process, which can be invaluable.
Step 3: Reassemble and Test
Once the new motor is securely installed and wired:
- Carefully reattach any panels you removed (back, top, or control panel), securing them with their screws.
- Plug your oven back into the power outlet or restore power at the circuit breaker.
- Test the oven. Try initiating a self-clean cycle to see if the door now locks correctly. If the door was stuck locked, ensure it now unlocks.
When to Call a Professional
While testing and replacing an oven door lock motor is a common DIY repair, there are times when calling a professional is the best course of action. If you're uncomfortable working with electrical components, can't locate the motor, or if the problem persists after replacement, it's wise to consult a qualified appliance technician. They can diagnose more complex issues and ensure your oven operates safely.
Conclusion
A malfunctioning oven door lock motor can be a significant inconvenience, but it doesn't have to mean buying a new oven. By understanding its function, recognizing the symptoms of failure, and following these testing and replacement steps, you can often restore your oven's full functionality. Always remember to prioritize safety, take your time, and if in doubt, seek professional help. With the right part and a little effort, your oven will be back to safely self-cleaning in no time!