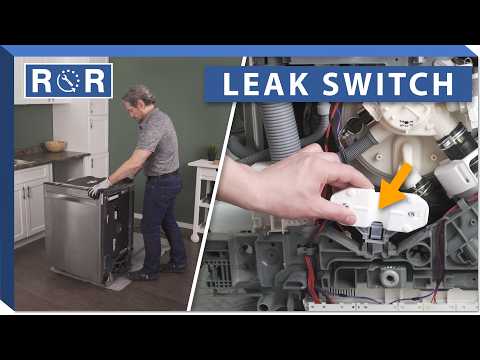
Dishwasher Leak Switch (Testing / Replacement)
A leaking dishwasher is every homeowner's nightmare. Beyond the obvious mess, it can lead to costly floor damage, cabinet rot, and even mold growth. While many things can cause a dishwasher to leak, one often-overlooked component is the **dishwasher leak switch**, sometimes called a flood switch or overflow switch. This small but mighty sensor is designed to detect water in your dishwasher's drip pan and shut down the machine before a small leak becomes a flood.
Understanding how your leak switch works, how to test it, and how to replace it can save you a significant amount of money on professional repairs and prevent extensive water damage. Let's dive in!
What is a Dishwasher Leak Switch?
The dishwasher leak switch is a safety device typically located in the bottom pan or base of your dishwasher. It's usually a float switch or a moisture sensor. When water accumulates in the pan (indicating a leak from somewhere inside the machine), the float rises or the sensor detects moisture, triggering the switch. This action tells the dishwasher's control board to stop the wash cycle, often activate the drain pump, and sometimes display an error code or an indicator light, effectively preventing a major spill.
If this switch malfunctions, it can either fail to detect a leak (allowing water to spill out) or falsely detect a leak (preventing your dishwasher from starting or completing a cycle, even when there's no water in the pan).
Signs of a Failing Leak Switch
How do you know if your leak switch might be the culprit behind your dishwasher woes?
- **Dishwasher Won't Start:** If your dishwasher refuses to start, or starts for a moment then stops, and there's no visible water in the tub or a clear error code for something else, a faulty leak switch falsely detecting water could be the issue.
- **Dishwasher Stops Mid-Cycle:** Similar to not starting, if it abruptly halts operations, especially with water still in the tub, the leak switch might be malfunctioning.
- **Error Codes:** Many modern dishwashers display specific error codes related to flood or leak detection. Consult your owner's manual for code interpretations.
- **Visible Water in the Drip Pan (but no error/shutdown):** If you find water in the base pan but the dishwasher continues to run as if nothing is wrong, your leak switch might not be activating correctly.
Before You Begin: Safety First!
Working with any appliance requires caution. Always prioritize safety:
- **Disconnect Power:** Unplug the dishwasher from the wall outlet or flip the circuit breaker off.
- **Shut Off Water Supply:** Turn off the water supply valve to the dishwasher, usually located under the sink.
- **Clear the Area:** Ensure you have enough space to work.
Testing Your Dishwasher Leak Switch
Testing the leak switch often involves accessing the underside of your dishwasher. This usually means pulling the appliance out from under the counter, or at least tilting it back.
Locating the Leak Switch
The leak switch is typically found in the base or drip pan of the dishwasher. You'll need to remove the lower access panel (kick plate) to get a good view. In some models, you might need to carefully tilt the entire unit back or even lay it on its side (after draining any water and disconnecting hoses).
For a visual guide on locating and accessing the leak switch, check out the provided video at https://www.youtube.com/watch?v=RK2PYcW8bcM. The video demonstrates how to access the bottom pan on a GE model, which is a common approach across many brands.
Visual Inspection
Once you've located the switch:
- **Check for Water:** Is there water in the drip pan? If so, your leak switch might be working correctly, and the leak is coming from another source (pump, hose, door seal). You'll need to dry the pan completely before further testing.
- **Inspect the Switch:** Look for any obvious damage, corrosion, or disconnected wires.
Continuity Testing with a Multimeter
This is the most definitive way to test a leak switch.
- **Disconnect Wires:** Carefully disconnect the electrical wires leading to the leak switch.
- **Set Multimeter:** Set your multimeter to the continuity setting (usually indicated by a sound wave or diode symbol). If it has an Ohm setting, choose the lowest Ohm range.
- **Test the Switch (Float Type):**
- **Float Down (No Water):** With the float in its resting, "down" position (no water detected), your multimeter should show continuity (a beep, or near 0 Ohms). This means the circuit is closed, allowing the dishwasher to run.
- **Float Up (Water Detected):** Manually lift the float to its "up" position. The multimeter should now show no continuity (no beep, or "OL" for open loop). This means the circuit is open, signaling a leak and preventing the dishwasher from running.
- **Test the Switch (Moisture Sensor Type):** For some moisture sensor types, testing can be more complex, as they often change resistance based on moisture. However, a basic continuity check between terminals when dry and then applying a small amount of water might give an indication. If unsure, compare resistance readings with a known good part or consult the service manual.
If your float switch doesn't show continuity when down and no continuity when up, or vice-versa, it's faulty and needs replacement.
Replacing Your Dishwasher Leak Switch
If your tests confirm a faulty leak switch, replacing it is a relatively straightforward repair for the DIY enthusiast.
What You'll Need:
- New Leak Switch (ensure it's compatible with your dishwasher's make and model)
- Screwdrivers (Phillips and/or flathead)
- Pliers (optional, for stubborn connectors)
- Towels
- Gloves (optional)
Step-by-Step Replacement:
- **Disconnect Power and Water:** (Reiterate safety!) Ensure the dishwasher is unplugged and the water supply is off.
- **Access the Switch:** Pull the dishwasher out and/or remove the lower access panel as you did for testing. You might need to tilt the dishwasher back carefully.
- **Disconnect Wires:** Carefully detach the electrical connectors from the old leak switch. Take a photo first to remember the wiring configuration if there's more than one wire.
- **Remove the Old Switch:** The leak switch is usually held in place by a clip, a tab, or a couple of screws. Release these fasteners and remove the old switch.
- **Install the New Switch:** Place the new leak switch into position, ensuring it's oriented correctly. Secure it with the clips or screws.
- **Reconnect Wires:** Attach the electrical connectors to the new switch. Double-check that they are secure.
- **Reassemble and Test:**
- Carefully put the dishwasher back into position.
- Reattach the lower access panel.
- Turn the water supply back on.
- Plug the dishwasher back in or flip the circuit breaker.
- Run a short cycle and observe closely for leaks and proper operation.
The YouTube video https://www.youtube.com/watch?v=RK2PYcW8bcM also provides excellent visual guidance for the removal and installation process of the leak switch once you've accessed the bottom pan.
Post-Replacement Check
After replacing the leak switch and before pushing the dishwasher completely back into its cabinet, run a quick rinse cycle. Watch the bottom pan carefully to ensure no new leaks appear from the installation point or anywhere else. Listen for unusual noises and verify that the dishwasher completes its cycle without any error codes related to flooding.
When to Call a Professional
While testing and replacing a leak switch is a manageable DIY task for many, there are times when calling a professional is the best course of action:
- **Difficulty Accessing:** If you cannot safely pull out or access the bottom of your dishwasher.
- **Uncertainty with Wiring/Components:** If you're uncomfortable with electrical components or the specific layout of your dishwasher is very complex.
- **Persistent Leaks:** If the leak persists after replacing the switch, indicating another source for the leak (e.g., pump, hose, door seal).
- **Other Complex Issues:** If the leak switch replacement doesn't resolve the primary problem, suggesting a more intricate issue with the control board or other components.
Conclusion
The dishwasher leak switch plays a vital role in protecting your home from water damage. By understanding its function, knowing how to test it, and being prepared to replace it, you can keep your dishwasher running smoothly and prevent potential disasters. Regular maintenance and prompt attention to minor issues can extend the life of your appliance and save you from larger, more expensive repairs down the road.