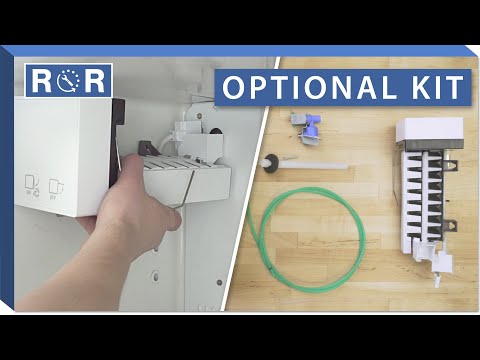
How to Install an Optional Ice Maker Kit
Upgrade Your Kitchen: A DIY Guide to Installing an Optional Ice Maker Kit
There's nothing quite like the convenience of fresh, readily available ice, especially during those warm summer months or when entertaining guests. If your refrigerator didn't come equipped with an ice maker, you might be surprised to learn that many models are designed to accommodate an optional ice maker kit. This DIY project is more straightforward than you might think, saving you the cost of a professional installation and giving you the satisfaction of a job well done. In this guide, we'll walk you through the process, ensuring you have all the information you need to add this fantastic feature to your appliance.
Why Install an Ice Maker?
Beyond the obvious benefit of having ice on demand, installing an ice maker kit offers several advantages:
- Convenience: No more refilling ice trays or buying bags of ice.
- Entertaining Made Easy: Keep drinks cool for parties and gatherings without hassle.
- Increased Appliance Value: A built-in ice maker can enhance the functionality and appeal of your refrigerator.
- Cost-Effective: Installing a kit is often much cheaper than purchasing a new refrigerator with an integrated ice maker.
Before You Begin: Essential Preparations
Before you grab your tools, a little preparation goes a long way to ensure a smooth and safe installation.
- Safety First: Always unplug your refrigerator from the power outlet to prevent electrical shock. Additionally, turn off the water supply to your home or, at minimum, the cold water line that will feed your refrigerator.
- Gather Your Tools: While kits vary, you'll generally need a few basic tools:
- Screwdriver (Phillips and/or flathead)
- Adjustable wrench or pliers (for water line connections)
- Utility knife or wire cutters (if splicing wires or tubing)
- Drill (if creating new mounting holes, though often unnecessary)
- Bucket and towels (for potential water drips)
- Check Compatibility: This is crucial! Ensure the optional ice maker kit you've purchased is specifically designed for your refrigerator model. Check your refrigerator's owner's manual or the manufacturer's website for compatible kits.
- Locate Water Supply: Your refrigerator will need a cold water line nearby. Most installations connect to the cold water line under your kitchen sink or directly from a dedicated water line behind the fridge. If you don't have an existing water line, you'll need to install one, which may require professional help.
For a visual overview of what to expect and the components involved, we recommend watching the initial steps of this helpful video: How to Install an Optional Ice Maker Kit. It provides a great starting point for understanding the general process.
Step-by-Step Installation Guide
While specific steps may vary slightly depending on your refrigerator model and ice maker kit, the following general instructions will guide you through the process.
1. Unpacking and Identifying Parts
Open your ice maker kit and lay out all the components. You should find the ice maker assembly, a water valve, mounting hardware, water tubing, and electrical connectors. Refer to your kit's instruction manual to identify each part.
2. Locating the Mounting Area
Inside your freezer compartment, you'll typically find pre-drilled holes or designated mounting points for an ice maker. These are usually on the upper left or right side wall. Your kit's instructions will confirm the exact location. You may need to remove shelves or bins for better access.
3. Installing the Water Valve (External)
The water valve is usually installed on the back of your refrigerator, often near the bottom where the existing water line (if any) enters the appliance. Locate the designated mounting area for the valve. Secure the valve using the provided screws and brackets. For a visual demonstration of a common water valve installation, refer to the section around the 1:15 mark in the referenced video.
4. Mounting the Ice Maker Unit (Internal)
Carefully position the ice maker assembly inside the freezer compartment, aligning it with the pre-drilled holes. Secure it with the screws provided in the kit. Ensure it's level and firmly attached.
5. Connecting the Water Line
This step involves connecting the water supply from the newly installed water valve (on the back of the fridge) to the ice maker unit inside the freezer.
- Connect to the Water Supply: Attach the main water supply line (from your home's plumbing) to the inlet of the water valve on the back of the fridge. Use an adjustable wrench and ensure connections are snug to prevent leaks.
- Internal Water Line: Feed the smaller water tube (usually plastic or copper) from the water valve on the back of the fridge up through the designated access hole into the freezer compartment.
- Connect to Ice Maker: Attach the internal water tube to the inlet port on the ice maker assembly. Again, ensure a secure, leak-free connection. The video at around 2:40 shows the internal water line connection clearly.
6. Electrical Connections
Most optional ice maker kits have a simple plug-and-play electrical connection. Locate the designated electrical receptacle inside your freezer compartment (often behind a cover plate or near the mounting area). Plug the ice maker's power cord into this receptacle. Ensure the connection is firm. The video around 3:20 demonstrates this connection.
7. Final Checks and Water Supply Activation
- Double-check all water connections for tightness.
- Ensure all electrical connections are secure.
- Replace any shelves or bins you removed.
- Turn your main water supply back on slowly and check for any immediate leaks at all connection points.
- Plug your refrigerator back into the power outlet.
It can take several hours (4-24 hours) for the ice maker to produce its first batch of ice, as the water line needs to fill, and the freezer needs to reach the optimal temperature. Discard the first few batches of ice to flush any impurities from the new water lines.
Troubleshooting Common Issues
If your new ice maker isn't working as expected, here are a few common issues and solutions:
- No Ice Production:
- Check if the ice maker's power switch (often a wire arm) is in the "down" or "on" position.
- Ensure the freezer temperature is set correctly (typically 0°F / -18°C).
- Verify the water supply is fully on and the water line isn't kinked.
- Check for clogs in the water filter (if your fridge has one).
- Confirm all electrical connections are secure.
- Leaking Water:
- Immediately turn off the water supply and unplug the fridge.
- Inspect all water line connections, both at the back of the fridge and inside the freezer, for tightness. A loose connection is the most common culprit.
- Check for cracks in the water line or valve.
- Small or Misshapen Ice Cubes:
- This often indicates low water pressure. Check your home's water pressure or look for kinks in the water line.
- A partially clogged water filter can also reduce water flow.
Enjoy Your New Ice Maker!
Congratulations! You've successfully installed your optional ice maker kit. Now you can enjoy the ultimate convenience of never running out of ice. Remember to keep the ice maker clean and periodically check the water filter (if applicable) for optimal performance.
If you encounter any difficulties or need replacement parts for your ice maker or any other appliance, don't hesitate to visit our extensive parts catalog. Our experts are always here to help you find exactly what you need to keep your home running smoothly.