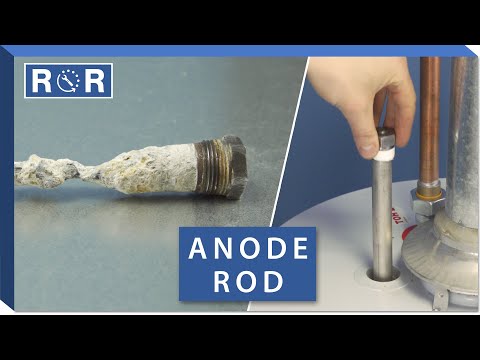
How to Replace the Anode in a Water Heater
If you have ever noticed a strange, rotten-egg odor coming from your tap, or if your water heater is starting to make unsettling rumbling noises, the culprit might not be a major mechanical failure. Often, the issue boils down to a single, highly hardworking component: the anode rod.
Frequently referred to as the "sacrificial anode," this metal rod is your water heater's first and best line of defense against rust and corrosion. Understanding how to replace it is one of the most valuable DIY maintenance skills you can learn to extend the lifespan of your appliance. In this guide, we will walk you through why this part matters and how you can swap it out yourself.
What Does a Water Heater Anode Rod Do?
To understand why the anode rod needs replacing, it helps to know how it works. Water heaters are made of steel, which naturally rusts when exposed to water over time. To prevent your tank from corroding and eventually leaking, manufacturers hang a thick rod made of magnesium, aluminum, or zinc down into the center of the tank.
Because of electrochemical processes, the water will aggressively attack the softer metal of the anode rod instead of eating away at the steel tank walls. In short, the rod "sacrifices" itself to save your water heater. Over a period of three to five years, that rod will completely dissolve. Once it is gone, rust will begin forming on the tank itself, drastically shortening the life of your appliance.
Signs It Is Time for a Replacement
Most homeowners don't think about their anode rod until something goes wrong. Here are the most common signs that your anode rod has been completely depleted and needs to be swapped out:
- Foul Odors: Sulfur or rotten-egg smelling hot water is often caused by bacteria reacting with the exposed steel of a depleted anode rod.
- Discolored Water: If your hot water looks rusty or brownish, the sacrificial metal is likely gone, and the tank itself has begun to rust.
- Age of the Unit: If your water heater is more than four years old and the anode has never been inspected or replaced, it is almost certainly due for a new one.
For a visual walkthrough of what a depleted rod looks like compared to a brand-new one, check out this helpful water heater anode replacement video tutorial, which demonstrates the exact condition to look for.
Tools and Materials You Will Need
Before you dive into the project, gather your supplies to ensure a smooth repair process. You will need:
- A brand-new anode rod (measure your clearance space beforehand; if ceiling height is an issue, you may need a segmented/flexible anode rod).
- A garden hose.
- A 1-1/16-inch socket and a heavy-duty breaker bar (anode rods are put in very tight at the factory).
- Pipe tape (Teflon tape) for sealing the threads of the new rod.
- A flathead screwdriver.
Step-by-Step Guide to Replacing Your Anode Rod
Safety always comes first when dealing with plumbing and electrical appliances. Follow these steps carefully to complete the replacement:
Step 1: Shut Off Power and Water
If you have an electric water heater, turn off the circuit breaker powering the unit immediately. Running an electric water heater with an empty tank will instantly burn out the heating elements. Next, shut off the cold-water supply valve located at the top of the water heater.
Step 2: Drain the Tank Partially
Attach a garden hose to the drain valve at the bottom of the water heater and run the other end to a safe drainage area (like a floor drain or outside). Open a hot water faucet somewhere in your house to act as an air vent, then open the tank's drain valve. You only need to drain about two to three gallons of water to lower the water level below the top of the tank, preventing a spill when you remove the rod.
Step 3: Locate and Remove the Old Anode Rod
Look at the top of your water heater. You will see the hot and cold water pipes, and typically a separate port where the hex-head of the anode rod protrudes. Sometimes it is hidden beneath a plastic cap or layer of insulation.
Attach your 1-1/16-inch socket and breaker bar to the hex head. Turn counter-clockwise to loosen it. Because these rods are factory-installed with immense torque—and often fused with scale—you may need to put some muscle into breaking it loose. Once loosened, unscrew the rest of the rod by hand and pull it straight up out of the tank.
Step 4: Inspect and Prepare the New Rod
Take a look at your old rod. If it is coated in calcium buildup or worn down to the core wire, it was definitely time for a change! Before installing the new rod, wrap the threaded end with three to four layers of Teflon tape in a clockwise direction to ensure a watertight seal.
Step 5: Install the New Anode Rod
Lower the new anode rod straight down into the opening at the top of the tank. Hand-thread it clockwise as far as you can to avoid cross-threading. Once it is finger-tight, use your socket wrench to snug it down firmly. Do not overtighten to the point of damaging the threads or the tank top.
Step 6: Refill and Restart
Close the drain valve at the bottom of the tank, disconnect your garden hose, and turn the cold-water supply back on. Leave the hot water faucet inside your house running until sputtering stops and a steady stream of water flows out—this ensures the tank is completely full of water and all trapped air is purged.
Finally, turn the power back on at the breaker box (for electric units) or check your pilot light (for gas units).
Protect Your Investment
Replacing your water heater's anode rod is a simple, cost-effective maintenance task that can easily double the lifespan of your appliance, saving you thousands of dollars on a premature full replacement. By checking this component every few years, you keep your water clean, your system efficient, and your home safe from unexpected leaks. If you ever run into a stubborn rod that simply won't budge or encounter other plumbing complications, don't hesitate to reach out to a professional appliance repair and plumbing service for assistance.