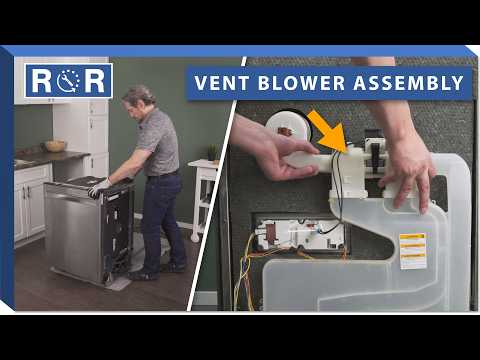
Dishwasher Vent Blower Assembly Replacement
Is Your Dishwasher Not Drying? It Might Be Time for a Vent Blower Assembly Replacement!
There's nothing more frustrating than unloading your dishwasher only to find your "clean" dishes are still soaking wet. While many factors can contribute to poor drying performance, a common culprit often goes unnoticed: the dishwasher vent blower assembly. This unsung hero plays a crucial role in ensuring your dishes come out spotless and dry. If you're experiencing persistently wet dishes or unusual noises, it might be time to consider a replacement.
What Does the Dishwasher Vent Blower Do?
Modern dishwashers, especially those without a visible heating element, rely on a vent blower assembly for efficient drying. After the wash and rinse cycles, this component kicks in to circulate warm, moist air out of the dishwasher tub and draw in drier, cooler air from the outside. This process, often combined with condensation drying, helps to evaporate residual moisture, leaving your dishes sparkling and dry. Without a functioning vent blower, moisture gets trapped inside, leading to wet dishes and sometimes even a musty odor.
Symptoms of a Failing Dishwasher Vent Blower Assembly
How do you know if your vent blower is the problem? Keep an eye (and ear) out for these tell-tale signs:
- Dishes Consistently Wet: This is the most obvious symptom. If your dishwasher completes its cycle but dishes are still covered in water droplets, the blower might not be doing its job.
- Unusual Noises: A failing motor or fan can produce grinding, buzzing, whirring, or squealing sounds during the drying cycle.
- Excessive Steam: While some steam is normal, if you notice an unusual amount of steam escaping from the dishwasher vent or around the door, it could indicate the blower isn't effectively expelling moisture.
- Error Codes: Some advanced dishwashers may display specific error codes related to the drying system or vent fan if a fault is detected. Consult your appliance manual.
Why Tackle a DIY Dishwasher Vent Blower Replacement?
Replacing a dishwasher vent blower assembly might sound daunting, but it's a repair many homeowners can successfully complete with the right guidance and tools. Here's why you should consider doing it yourself:
- Cost Savings: Professional repair can be expensive, often including labor fees that exceed the cost of the part itself.
- Quick Resolution: Ordering the part and doing it yourself can often get your dishwasher back in action faster than waiting for a service appointment.
- Empowerment: Learning to fix your own appliances builds confidence and valuable skills.
Tools You'll Need for the Job
Before you begin, gather these essential tools:
- Screwdrivers (Phillips and flathead)
- Nut drivers or a socket set (various sizes)
- Pliers (needle-nose may be helpful)
- Work gloves
- Flashlight or headlamp
- Towel or old rags
- New dishwasher vent blower assembly (ensure it's the correct part for your model!)
Safety First: Crucial Precautions Before You Start
Appliance repair always requires caution. Follow these safety steps to protect yourself and your home:
- Disconnect Power: ALWAYS unplug your dishwasher from the wall outlet or flip the circuit breaker off before touching any internal components.
- Shut Off Water Supply: Turn off the water supply valve leading to the dishwasher to prevent accidental leaks.
- Wear Gloves: Protect your hands from sharp edges and components.
- Work in a Well-Lit Area: Good visibility is key to preventing mistakes.
Step-by-Step Guide: Replacing Your Dishwasher Vent Blower Assembly
While specific steps can vary slightly by dishwasher model, this general guide covers the typical process. For a fantastic visual walkthrough that covers many common models, we highly recommend watching this helpful video: Dishwasher Vent Blower Replacement Video Guide.
1. Prepare the Dishwasher
With power and water disconnected, carefully pull your dishwasher out from under the counter. You might need to unscrew mounting brackets that secure it to the countertop or cabinets. Lay down a towel to catch any residual water.
2. Access the Vent Blower Assembly
The vent blower assembly is typically located on the side or top of the dishwasher tub, often near the detergent dispenser or control panel.
- Front Access (Common): You may need to remove the outer door panel, control panel, or sometimes even the inner door panel to gain access. Look for screws around the perimeter of the door or behind the kickplate.
- Side Access: Some models require removing a side panel of the dishwasher.
- Top Access: Less common, but some designs might have it accessible from the top once the dishwasher is pulled out.
Refer to your dishwasher's owner's manual or a parts diagram for the exact location. The video linked above demonstrates accessing it from the front, which is a very common method.
3. Disconnect Wiring and Hoses (If Applicable)
Once you've located the vent blower assembly, you'll see electrical wires connected to it.
- Take a picture of the wiring configuration before disconnecting anything! This will be invaluable during reassembly.
- Gently disconnect the electrical connectors.
- Some vent blowers might have a small air hose connected. Carefully detach this if present.
4. Remove the Old Assembly
The blower assembly is usually secured with screws, clips, or a combination of both.
- Unscrew any mounting screws holding the assembly in place.
- Carefully release any clips or tabs.
- Gently pull the old assembly out of its housing. There might be a rubber gasket that seals it to the tub – be mindful of this.
5. Install the New Assembly
Reverse the removal steps to install your new vent blower assembly.
- Ensure the new assembly seats correctly into its opening. If there's a gasket, make sure it's properly sealed to prevent leaks.
- Secure it with the screws or clips you removed earlier.
- Reconnect the electrical wiring, referencing your photo to ensure correct connections.
- If there was an air hose, reattach it securely.
6. Reassemble and Test
Once the new blower is installed:
- Reattach any panels or the door you removed.
- Carefully slide the dishwasher back into its cabinet, re-securing any mounting brackets.
- Turn the water supply back on.
- Restore power to the dishwasher.
- Run a short cycle (e.g., rinse only) to check for any leaks and to ensure the new blower operates correctly and quietly. Pay attention during the drying phase to see if the problem is resolved.
Common Pitfalls to Avoid
- Wrong Part: Always double-check your dishwasher's model number and order the exact replacement part. Even slight variations can make a part incompatible.
- Forgetting to Disconnect Power/Water: This is the most crucial safety step.
- Damaging Wires: Be gentle when disconnecting and reconnecting electrical components.
- Improper Sealing: Ensure any gaskets or seals are correctly seated to prevent leaks.
- Rushing: Take your time. Patience is your best tool for successful DIY repairs.
Get Your Dishes Drying Perfectly Again!
A non-functioning dishwasher vent blower assembly can turn dishwashing into a damp disappointment. By understanding the symptoms and following these steps, you can confidently tackle this repair yourself, saving money and restoring your dishwasher's peak performance. Remember, our store offers a wide selection of genuine dishwasher replacement parts, including vent blower assemblies, for various brands and models. Don't let wet dishes get you down – get the parts you need today and enjoy perfectly dry dishes once more!