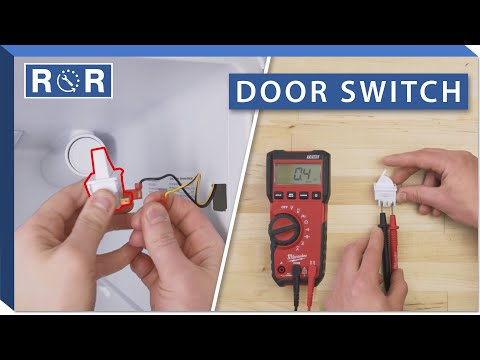
Refrigerator Door Switch - Testing & Replacement
Your refrigerator works hard 24/7 to keep your food fresh, but sometimes a small component can throw a wrench in its operation. One such unsung hero is the refrigerator door switch. This tiny mechanism plays a crucial role, not just in controlling your fridge's interior light, but also in managing its cooling cycles and overall energy efficiency.
If your refrigerator light isn't coming on, or if your appliance seems to be running constantly, a faulty door switch could be the surprising culprit. The good news? Testing and replacing this part is often a straightforward DIY repair that can save you money on service calls and prevent more significant issues down the line.
What Does Your Refrigerator Door Switch Do?
The refrigerator door switch is a simple electrical component, typically a push-button or lever-style switch, located in the door frame or near the hinge. Its primary functions include:
- Controlling the Interior Light: When you open the door, the switch releases, completing a circuit that turns on the light. When you close it, the switch is pressed in, breaking the circuit and turning the light off.
- Managing Defrost Cycles: Many refrigerators use the door switch to pause the defrost cycle if the door is opened, preventing unnecessary energy consumption.
- Regulating Compressor Activity: In some advanced models, a faulty door switch could even trick the refrigerator into thinking the door is constantly open, causing the compressor to run more often than needed to maintain temperature.
Symptoms of a Faulty Refrigerator Door Switch
Identifying a bad door switch usually comes down to a few clear signs:
- Refrigerator Light Not Working: The most common symptom. The light either stays off when the door is open or, less commonly, stays on when the door is closed (which can lead to heat buildup and energy waste).
- Refrigerator Running Constantly: If the switch is stuck in the "open" position, your fridge might think the door is always ajar, causing the compressor to work overtime to maintain temperature.
- Excessive Frost Buildup: Particularly in the freezer, a perpetually "open" signal can lead to warm air entering, causing frost to accumulate.
- Water Leaks or Inefficient Cooling: While less direct, these can be secondary effects of your fridge struggling due to a malfunctioning switch.
Safety First: Always Unplug!
Before attempting any inspection, testing, or repair on your refrigerator, your absolute first step is to disconnect it from the power supply. Pull the plug from the wall outlet. This prevents electrical shock and potential damage to your appliance.
How to Test Your Refrigerator Door Switch
Testing your door switch is a simple process that requires minimal tools. Here's how to do it:
1. Visual Inspection
First, visually inspect the switch. Look for any obvious signs of damage, such as cracks, loose wires, or sticky residue that might prevent it from moving freely. Push the switch in and release it a few times. Does it move smoothly, or does it feel stiff or stuck?
2. Manual Activation Test (for Light Issues)
If your primary issue is the light, try this simple test:
- With the refrigerator plugged in and the door open, press the door switch in manually with your finger.
- The light should turn off.
- Release the switch. The light should turn back on.
If the light doesn't respond correctly, the switch is likely faulty. Remember to unplug the fridge again before proceeding with further tests or replacement.
3. Multimeter Test for Continuity
For a more definitive diagnosis, especially if you suspect the switch is affecting more than just the light, use a multimeter to test for continuity. This will tell you if the switch is properly completing and breaking the electrical circuit.
- Unplug the refrigerator.
- Carefully pry the door switch out of its housing. You may need a flat-head screwdriver for this. Most switches simply snap into place.
- Disconnect the wires attached to the switch. Make a note or take a picture of which wire goes to which terminal if there are multiple.
- Set your multimeter to the continuity setting (usually indicated by a speaker icon or ohms symbol).
- Place one probe on each terminal of the switch.
- With the switch in the "released" position (as if the door is open), the multimeter should beep or show a reading indicating continuity (a closed circuit).
- With the switch pressed in (as if the door is closed), the multimeter should show no continuity (an open circuit).
If your switch doesn't behave this way (e.g., it always shows continuity, or never shows continuity), it's defective and needs to be replaced. For a clear visual demonstration of this multimeter test, you can reference this helpful video tutorial, especially around the 1:00 mark.
How to Replace Your Refrigerator Door Switch
Once you've confirmed your door switch is faulty, replacing it is a quick and satisfying repair.
Tools You'll Need:
- New refrigerator door switch (ensure it's compatible with your model!)
- Flat-head screwdriver
- Needle-nose pliers (optional, for stubborn wire connections)
Replacement Steps:
- Unplug the Refrigerator: Again, safety first!
- Locate and Remove the Old Switch: Carefully use your flat-head screwdriver to gently pry the old switch out of its housing in the door frame. It usually pops out with moderate pressure.
- Disconnect Wires: Note the orientation of the wires before disconnecting them. Take a picture if necessary. Gently pull the wire connectors off the terminals of the old switch.
- Connect the New Switch: Attach the wires to the corresponding terminals on your new door switch. Ensure they are securely fastened.
- Install the New Switch: Push the new switch firmly into the opening in the refrigerator frame until it snaps securely into place.
- Test the Repair: Plug the refrigerator back into the power outlet. Open and close the door a few times to ensure the light turns on and off correctly. If your previous issue was constant running, listen for the compressor to cycle off as expected when the door is closed.
For a step-by-step visual guide on replacing your refrigerator door switch, you can follow along with the demonstration in the provided video, particularly from the 2:00 mark onwards.
When to Call a Professional
While testing and replacing a door switch is a common DIY fix, there are times when it's best to call a qualified appliance repair technician:
- If you're uncomfortable working with electrical components.
- If testing confirms the door switch is working, but your refrigerator's symptoms persist. This indicates a more complex underlying issue (e.g., a control board problem, thermostat issue, or compressor malfunction).
- If you encounter unexpected difficulties during the repair.
Conclusion
A functional refrigerator door switch is vital for the efficient operation of your appliance. By learning how to test and replace this small but mighty component, you can quickly diagnose and fix common refrigerator problems, save money on repairs, and ensure your fridge continues to keep your food perfectly chilled. If you need a new door switch or any other appliance part, explore our extensive inventory to find exactly what you need!