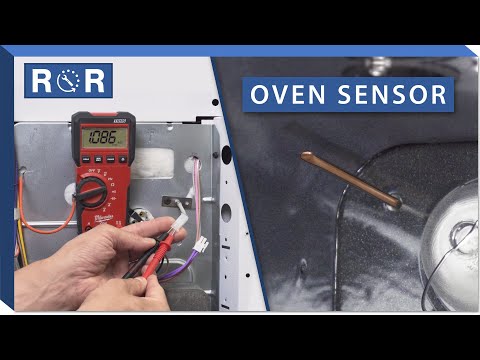
Oven Temperature Sensor - Testing & Replacement
Is Your Oven Lying to You? How to Test and Replace a Faulty Temperature Sensor
There's nothing quite as frustrating as pulling a seemingly perfectly timed dish out of the oven, only to find it undercooked in the middle or burnt to a crisp on top. If your oven isn't cooking food evenly, or if temperatures seem wildly inaccurate, a common culprit might be a faulty oven temperature sensor. This small but mighty component plays a crucial role in maintaining precise temperatures, ensuring your culinary creations turn out just right.
At our appliance parts and repair company, we understand the importance of a reliable oven. In this guide, we'll walk you through how to diagnose and replace a problematic oven temperature sensor, saving you time, money, and countless ruined meals.
Why Your Oven Temperature Sensor Matters
The oven temperature sensor, often called a thermistor or probe, is essentially the oven's thermometer. It continuously monitors the internal temperature and communicates with the control board. Based on this feedback, the control board cycles the heating elements on and off to maintain your desired setting. When this sensor malfunctions, the control board receives inaccurate information, leading to:
- Inconsistent cooking results (burnt edges, raw centers)
- Longer preheat times or inability to reach target temperature
- Excessive energy consumption as the oven overcompensates
- Error codes displayed on digital models
- Potential safety hazards if the oven overheats
Symptoms of a Faulty Oven Temperature Sensor
How do you know if your oven temperature sensor is to blame? Look out for these tell-tale signs:
- Inaccurate Temperatures: The most common symptom. Use an independent oven thermometer to verify if your oven's internal temperature consistently differs by more than 25-50 degrees Fahrenheit from the set temperature.
- Long Preheat Times: If your oven takes an unusually long time to preheat, or never seems to reach the set temperature, the sensor might be giving false readings.
- Error Codes: Many modern ovens will display specific error codes (e.g., F30, F31, E1, E2, depending on the brand) if the control board detects an issue with the temperature sensor circuit. Consult your oven's manual for specific codes.
- Food Burning or Undercooking: Direct evidence that your oven isn't maintaining the correct heat.
- Oven Not Heating At All: While other components can cause this, a completely failed sensor can sometimes prevent heating.
Tools You'll Need for Testing & Replacement
Before you begin, gather these essential tools:
- Screwdriver Set: Phillips head and potentially a Torx bit set for various oven models.
- Multimeter: Capable of measuring resistance (Ohms). This is crucial for testing.
- Oven Thermometer: For initial diagnosis and post-repair verification.
- Needle-Nose Pliers: Helpful for disconnecting wires in tight spaces.
- Work Gloves: For safety and to protect your hands.
- New Oven Temperature Sensor: Once you've confirmed the fault, ensure you have the correct replacement part for your oven's make and model.
Safety First! Important Precautions
Working with any appliance requires caution. Always prioritize safety:
- UNPLUG THE OVEN: This is the most critical step. Disconnect your oven from the power outlet or switch off the corresponding circuit breaker before touching any components.
- Allow Oven to Cool: Ensure the oven cavity is completely cool to the touch before you begin.
- Wear Gloves: Protect your hands from sharp edges or hot spots.
- Follow Manufacturer's Instructions: Always refer to your oven's owner's manual for specific disassembly and safety guidelines.
How to Test Your Oven Temperature Sensor (Step-by-Step)
Testing the sensor involves checking its electrical resistance with a multimeter. This is often the most definitive way to confirm if it's faulty.
1. Locate the Sensor
The temperature sensor is typically a thin metal probe, often located at the top rear corner of the oven cavity, sometimes on a side wall. It's usually held in place by one or two screws.
2. Access and Disconnect
Carefully remove the screws holding the sensor in place. Gently pull the sensor into the oven cavity. You'll usually find the electrical connector behind the rear wall of the oven. You may need to pull the oven away from the wall to access the back panel, or in some cases, the wires can be disconnected from inside the oven cavity itself.
Disconnect the wires from the sensor. Be gentle; they can be delicate.
3. Perform the Resistance Test with a Multimeter
Set your multimeter to the Ohms (Ω) setting, usually in the 200k or 2k range. Touch one probe from the multimeter to each of the sensor's terminals. A healthy oven temperature sensor should typically read around 1080 to 1100 Ohms (Ω) at room temperature (around 70-75°F or 21-24°C). This value will increase as the sensor gets hotter.
- A "good" reading: Close to 1080-1100 Ohms at room temperature.
- A "bad" reading:
- No reading (open circuit, often displayed as "OL" or "1" on the multimeter) indicates a complete break in the sensor.
- A very low or very high reading (significantly outside the expected range) indicates internal damage.
- A fluctuating reading when the sensor is stable suggests an intermittent fault.
For a clear, visual guide on how to perform this test and what to look for, we highly recommend watching this helpful video: Oven Temperature Sensor Testing & Replacement Guide. The video demonstrates the multimeter test and sensor location clearly, which can be invaluable during your DIY repair.
How to Replace Your Oven Temperature Sensor (Step-by-Step)
If your multimeter test confirms a faulty sensor, it's time for a replacement. Make sure you have the correct part for your oven's model number before proceeding.
1. Order the Correct Part
Always use your oven's full model number to order the exact replacement temperature sensor. Generic parts may not work correctly or fit properly.
2. Disconnect the Old Sensor
With the power still off, remove the mounting screws holding the faulty sensor in place (if you haven't already). Gently pull the sensor and its wiring out from the oven cavity or the back of the oven.
3. Install the New Sensor
Carefully slide the new sensor into position. Align it with the mounting holes and secure it with the screws. Ensure it's snugly in place but do not overtighten.
4. Reconnect Wires
Connect the new sensor's wires to the oven's wiring harness. Ensure the connections are firm and secure. If you had to remove a back panel, reattach it now.
5. Reassemble Oven & Test
Push the oven back into its original position if you moved it. Plug the oven back into the outlet or switch the circuit breaker back on. Set your oven to a common baking temperature (e.g., 350°F or 175°C) and let it preheat. Use your independent oven thermometer to verify that the oven now reaches and maintains the correct temperature.
The replacement process is also thoroughly covered in the video mentioned earlier (Oven Temperature Sensor Testing & Replacement Guide), providing excellent visual cues for each step of disconnecting and reconnecting the sensor.
Pro Tips for Oven Sensor Maintenance
- Keep it Clean: While the sensor itself doesn't typically get dirty, a clean oven overall helps it function efficiently.
- Avoid Harsh Chemicals: Be careful not to spray oven cleaners directly onto the sensor, as this could damage its delicate components.
- Regular Calibration Check: Periodically use an external oven thermometer to ensure your oven is still calibrated correctly.
Get Your Oven Cooking Right Again!
A functional oven temperature sensor is key to consistent, delicious results and an efficient appliance. By following these steps for testing and replacement, you can often resolve common oven heating issues yourself, saving on costly service calls.
Need a new oven temperature sensor or other appliance parts? Visit our online store for a wide selection of genuine replacement parts for all major brands. If you're not comfortable with a DIY repair, don't hesitate to contact our professional repair technicians for assistance. We're here to help you get your kitchen back in perfect working order!