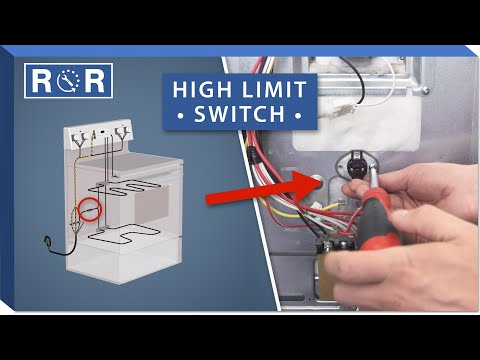
Oven High Limit Switch - Testing & Replacement
Is Your Oven Overheating or Not Heating at All? It Might Be the High Limit Switch!
Is your oven behaving erratically? Perhaps it's refusing to heat up, or worse, getting dangerously hot? While many components can cause these issues, one often-overlooked culprit is the oven's high limit switch. This crucial safety device plays a vital role in preventing your appliance from overheating and becoming a fire hazard. Understanding how to test and replace it can save you time, money, and ensure your kitchen remains a safe cooking space.
What Exactly is an Oven High Limit Switch?
Think of your oven's high limit switch as a thermal bodyguard. Its primary function is to monitor the temperature within the oven cavity or specific components (like the self-cleaning element). If the temperature exceeds a predetermined, safe threshold – typically due to a malfunctioning thermostat or other heating issues – this switch acts as a circuit breaker. It automatically cuts power to the heating elements, preventing the oven from overheating to dangerous levels and potentially causing damage or a fire. Once the temperature drops back down, some high limit switches will reset automatically, while others are manual reset types that require a button press.
Symptoms of a Faulty Oven High Limit Switch
Recognizing the signs of a failing high limit switch is the first step towards a fix. Here are the most common symptoms:
- Oven Not Heating: This is a very common symptom. If the switch has tripped and is stuck in the open (off) position, it will continuously cut power to the heating elements, preventing the oven from reaching temperature.
- Oven Overheating: Less common but possible. If the switch fails to trip when it should, or if the thermostat is also faulty, the oven could get dangerously hot. This is a serious safety concern.
- Intermittent Heating: The oven heats, then stops, then heats again. A failing switch might be tripping and resetting erratically.
- Error Codes: Modern ovens often display specific error codes related to overheating or sensor failures, which can sometimes point to the high limit switch. Consult your owner's manual for specific codes.
- Self-Clean Cycle Issues: Many high limit switches are particularly active during the self-cleaning cycle, which reaches much higher temperatures. If your oven fails during self-clean or won't heat afterward, the high limit switch could be the culprit.
Safety First: Always Disconnect Power!
Before you even think about touching any internal components of your oven, the absolute most critical step is to ensure it is completely disconnected from its power source. This means unplugging it from the wall outlet or, for hardwired units, turning off the corresponding circuit breaker in your home's electrical panel. Failing to do so can result in serious electrical shock or injury.
Tools You'll Need for Testing & Replacement
Gathering your tools beforehand will make the process smoother:
- Multimeter: Essential for testing continuity.
- Screwdrivers: Phillips and flathead, various sizes.
- Nut Drivers or Socket Set: For removing panels and mounting screws.
- Pliers: Needle-nose for disconnecting wires.
- Work Gloves: For protection.
- Flashlight or Headlamp: To illuminate dark areas.
- Replacement High Limit Switch: (If you've already diagnosed it or are replacing proactively). Ensure it's the correct part for your oven's make and model.
How to Test an Oven High Limit Switch
Testing your high limit switch is a relatively straightforward process using a multimeter. Here's how to do it:
- Access the Switch: The high limit switch is typically located on the back of the oven, often near the top, or sometimes within the control panel area. You'll likely need to pull the oven away from the wall and remove the rear access panel. Some models might have it accessible from the top or front. Consult your oven's service manual or parts diagram for its exact location.
- Disconnect Wires: Carefully note or take a picture of which wires connect to which terminals on the switch. Then, gently disconnect the wires.
- Set Your Multimeter: Turn your multimeter to the continuity setting (usually indicated by a speaker icon or ohms Ω symbol). Touch the probes together to ensure it beeps or reads zero, indicating continuity.
- Test for Continuity: Touch one multimeter probe to each terminal of the high limit switch.
- Interpret Results:
- Good Switch (Closed/Normal): The multimeter should beep or show a reading close to zero ohms (indicating continuity). This means power can flow through the switch.
- Bad Switch (Open/Tripped): The multimeter should not beep and show "OL" or "1" (indicating an open circuit). If it's a manual reset switch, try pressing the small reset button (if present) and retest. If it still shows no continuity after resetting, it's faulty.
- Visual Reference: For a clear visual guide on how to locate and test this component, check out this helpful video from AppliancePartsPros.com, especially around the 0:50 mark for multimeter testing.
If your high limit switch shows no continuity (and cannot be reset), it needs to be replaced.
How to Replace an Oven High Limit Switch
Once you've confirmed the switch is faulty, replacement is the next step:
- Ensure Power is Off: Double-check that your oven is completely unplugged or the circuit breaker is off.
- Access the Switch: As before, pull the oven out and remove the necessary access panels to expose the high limit switch.
- Remove the Old Switch: Disconnect any remaining wires (if you didn't do so during testing). Use your screwdriver or nut driver to remove the screws or clips holding the old switch in place. Carefully remove the old switch.
- Install the New Switch: Take your new, identical high limit switch. Position it correctly and secure it with the mounting screws or clips.
- Reconnect Wires: Reattach the wires to the new switch's terminals, ensuring they are secure. Refer to the picture you took earlier if needed.
- Reassemble and Test: Replace all access panels and push the oven back into its position. Plug the oven back in or restore power at the circuit breaker. Turn on your oven and test its functionality. It should now heat up correctly and maintain the set temperature.
The referenced video also provides excellent visual guidance for the removal and installation process, particularly from the 1:20 mark onwards.
DIY or Call a Pro?
Replacing an oven high limit switch is a manageable DIY project for those comfortable with basic appliance repair and electrical safety. The tools are common, and the process is largely mechanical. However, if you're unsure at any step, uncomfortable working with electrical components, or if the issue persists after replacement, it's always best to consult a qualified appliance repair technician. Safety should always be your top priority.
Keep Your Oven Safe and Functional
The oven high limit switch is a small but critical safety component in your kitchen appliance. Understanding its function, recognizing the signs of failure, and knowing how to test and replace it can help you troubleshoot common oven problems effectively. By taking a proactive approach to appliance maintenance, you can extend the life of your oven and ensure safe cooking for years to come. Need a new high limit switch or other oven parts? Visit our extensive online catalog to find the exact replacement for your model today!