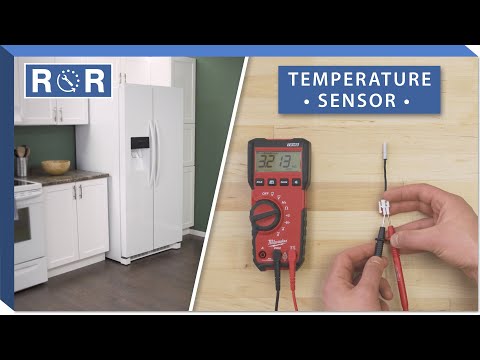
How to Test & Replace a Thermistor (Refrigerator)
Is your refrigerator struggling to maintain a consistent temperature? Are your fresh foods freezing or spoiling too quickly? A faulty thermistor might be the culprit. This small but mighty component plays a crucial role in your refrigerator's cooling system, and a simple DIY test and replacement can often restore your appliance to perfect working order.
At [Your Company Name], we empower homeowners to tackle common appliance repairs, saving you time and money. In this comprehensive guide, we'll walk you through how to test and replace a refrigerator thermistor, complete with helpful tips and safety precautions.
What is a Refrigerator Thermistor and Why is it Important?
A thermistor is a type of resistor whose resistance varies significantly with temperature. In your refrigerator, it acts as the "eyes" of the control board, constantly monitoring the temperature inside the fresh food and freezer compartments. It sends these temperature readings back to the main control board, which then decides when to activate the compressor, fans, and defrost heater to maintain your set temperature.
When a thermistor goes bad, it sends inaccurate temperature signals, leading to a range of cooling problems. This can result in your fridge running too much, not enough, or erratically, costing you money on energy bills and potentially spoiling food.
Symptoms of a Faulty Refrigerator Thermistor
Before you grab your tools, it's good to know what signs point to a thermistor issue:
- Inconsistent Temperatures: The most common symptom. Your fridge might be too cold (freezing food) or too warm (food spoiling).
- Refrigerator Runs Constantly: If the thermistor reads the temperature as too high, the compressor will run non-stop trying to cool it down.
- Refrigerator Doesn't Run Enough: Conversely, if it reads the temperature as too low, the compressor won't kick on often enough.
- Error Codes: Many modern refrigerators display specific error codes related to thermistor malfunctions. Consult your appliance's manual.
- Defrost Issues: A faulty thermistor can interfere with the defrost cycle, leading to excessive frost buildup.
Tools You'll Need
Gather these items before you begin:
- Multimeter (with resistance/ohm setting)
- Screwdrivers (Phillips and flathead)
- Nut drivers or socket set (if applicable)
- Needle-nose pliers
- New replacement thermistor (ensure it's the correct part for your model!)
- Gloves (optional, for comfort)
- Camera or smartphone (to document disassembly)
Safety First!
Always disconnect your refrigerator from the power outlet before performing any repairs. This is critical to prevent electrical shock. If your refrigerator is on a dedicated circuit, you can also turn off the breaker for added safety.
How to Locate Your Refrigerator Thermistor
The location of the thermistor can vary significantly depending on your refrigerator's make and model. However, here are some common places to check:
- Fresh Food Compartment: Often located near the top, side, or back wall, sometimes behind a light housing or vent cover.
- Freezer Compartment: Similar to the fresh food section, it might be behind a panel or near the evaporator coils.
- Behind the Control Panel: In some models, especially those with advanced electronic controls, a thermistor might be integrated into the control panel itself.
Pro Tip: Consult your refrigerator's owner's manual or a service manual for the exact location of the thermistor(s) in your specific model. A quick online search with your model number and "thermistor location" can also yield helpful diagrams or videos.
How to Test Your Refrigerator Thermistor
Once you've located the thermistor, it's time to test it. This process involves checking its electrical resistance with a multimeter.
- Disconnect Power: Ensure the refrigerator is unplugged.
- Access the Thermistor: You may need to remove shelves, drawers, or interior panels to get to it. Use your camera to take pictures as you disassemble, which will help with reassembly.
- Disconnect Thermistor Wires: Carefully unplug the thermistor's wiring harness from the main control board or its connection point.
- Set Your Multimeter: Turn your multimeter to the ohms (Ω) setting. If it has a range selector, start with a lower range (e.g., 20K ohms) and adjust as needed.
- Measure Resistance: Place the multimeter probes onto the two terminals of the thermistor.
- Check Temperature: Note the ambient temperature of the compartment you are testing.
- Compare Readings: This is the crucial step. You need to compare your multimeter's resistance reading to the manufacturer's specifications for your specific refrigerator model and the current temperature.
What to look for:
- Open Circuit (OL or infinite resistance): If your multimeter shows "OL" (overload) or a very high, unstable reading, the thermistor is likely open and faulty.
- Short Circuit (0 or very low resistance): A reading of 0 or close to 0 ohms indicates a shorted thermistor, which is also faulty.
- Incorrect Resistance: Even if it's not completely open or shorted, if the resistance reading doesn't match the manufacturer's chart for the current temperature, it's defective. Thermistors typically have higher resistance at colder temperatures and lower resistance at warmer temperatures.
Need a visual guide for accessing and testing refrigerator components? This video provides an excellent overview of refrigerator troubleshooting that can help you understand the process: Refrigerator Troubleshooting & Repair Guide.
How to Replace Your Refrigerator Thermistor
If your testing confirms a faulty thermistor, replacement is straightforward:
- Ensure You Have the Right Part: Double-check that your new thermistor matches the old one in terms of part number and specifications.
- Disconnect Power (Again!): Safety first, always.
- Remove the Old Thermistor:
- Carefully unclip or unscrew the old thermistor from its mounting location.
- Disconnect its electrical connector.
- If the thermistor is encased in a plastic housing, you may need to gently pry it open.
- Install the New Thermistor:
- Connect the new thermistor's electrical connector.
- Mount the new thermistor in the exact same location and orientation as the old one. Ensure it's securely in place.
- Reassemble Your Refrigerator: Put back any panels, shelves, or drawers you removed, referring to your photos if needed.
- Restore Power and Test: Plug your refrigerator back in and set your desired temperature. Monitor its performance over the next 24 hours to ensure it's cooling consistently.
Still Having Trouble?
If replacing the thermistor doesn't resolve your refrigerator's issues, don't despair. Other components could be at fault, such as the defrost timer, defrost heater, main control board, or even the compressor. In such cases, it might be time to consult a professional appliance technician or consider if it's more cost-effective to replace the entire appliance.
Get Your Refrigerator Parts at [Your Company Name]
A DIY refrigerator repair can save you a significant amount of money and extend the life of your appliance. By following these steps, you can confidently test and replace a faulty thermistor. Need a new thermistor or other refrigerator parts? Visit our extensive online catalog at [Your Website Link] or contact our knowledgeable team for assistance in finding the exact part you need for your model!