How Oven Self-Cleaning Works
The dreaded task of cleaning a greasy, caked-on oven interior used to be a weekend-killing chore. Then came the self-cleaning oven, a true marvel of modern appliance engineering! But how exactly does this convenient feature work its magic, transforming burnt-on messes into a pile of easily wipeable ash? Let's pull back the curtain and explore the science and steps behind your oven's incredible self-cleaning cycle.
Understanding the Pyrolytic Cleaning Process
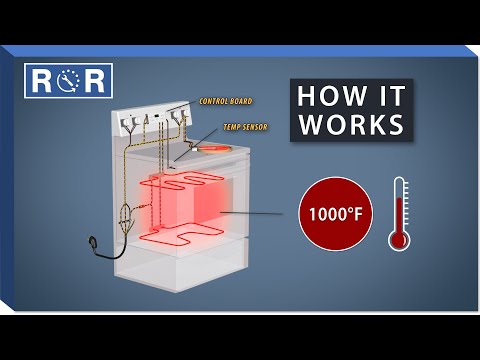
At its core, oven self-cleaning relies on a process called pyrolysis. This isn't a fancy chemical reaction; it's simply the decomposition of organic material (like food spills and grease) using extreme heat in the absence of oxygen. When you engage your oven's self-clean function, it heats up to incredibly high temperatures, typically between 900°F and 1000°F (480°C to 540°C).
During this intense heat cycle, any food residue, grease, or grime inside the oven cavity is superheated. It literally bakes, chars, and eventually disintegrates into a fine, powdery ash. This process takes several hours, ensuring that even the most stubborn, baked-on spills are thoroughly carbonized.
To safely achieve these temperatures, self-cleaning ovens are built with extra insulation and a robust door locking mechanism. The door automatically locks at the beginning of the cycle and remains locked until the oven has cooled down to a safe temperature, preventing accidental opening and exposure to the extreme heat. Many ovens also employ special cooling fans to protect external components and cabinetry from the internal heat.
Before You Begin: Essential Preparation Steps
While your oven does most of the heavy lifting, a little preparation on your part ensures a safer and more effective cleaning cycle. Skipping these steps can lead to excessive smoke, lingering odors, or even damage to your oven.
- Remove Everything: Take out all oven racks, baking stones, temperature probes, aluminum foil, and any other accessories. These items are generally not designed to withstand the high temperatures of a self-cleaning cycle and can warp, discolor, or sustain damage. Clean them separately by hand.
- Wipe Up Loose Debris: Use a damp cloth or sponge to wipe away any large crumbs, food particles, or standing puddles of grease. While the self-clean cycle will handle residue, removing excess debris will reduce smoke and odors during the process.
- Ensure Ventilation: Open windows and turn on your kitchen exhaust fan. This is crucial for dissipating any smoke or fumes that may be produced during the cycle.
- Protect Pets: Birds and other small pets are particularly sensitive to fumes. It's best to move them to a different, well-ventilated area of your home during and immediately after the cleaning cycle.
For a visual guide on how to prepare your oven for self-cleaning, you might find this video helpful, especially around the 0:25 mark where it discusses removing racks and wiping loose debris: Oven Self-Cleaning Video.
The Self-Cleaning Cycle: What to Expect
Once you've prepped your oven and initiated the self-clean function, here’s what you can anticipate:
- Door Locks: The oven door will automatically lock. Do not attempt to force it open.
- Rising Temperatures: The oven will gradually heat up to its extreme cleaning temperature.
- Smoke and Odor: You may notice some smoke and a burning odor, especially if your oven was particularly dirty. This is normal as food residue is incinerated. This is why good ventilation is so important!
- Duration: The cycle typically lasts anywhere from 2 to 6 hours, depending on your oven model and the chosen cleaning intensity.
- Cool-Down Period: After the heating cycle completes, the oven will enter a cool-down phase. The door will remain locked until the internal temperature drops to a safe level, usually below 300°F (150°C). This can take an additional 30 minutes to an hour or more.
After the Cycle: The Final Touches
Once the cycle is complete and the oven door has unlocked, the hard work is almost done!
- Wipe Away Ash: Using a damp cloth or sponge, simply wipe away the powdery white ash from the bottom and sides of the oven cavity. The residue should come off easily.
- Reinstall Racks: Once the oven is completely cool and clean, you can reinstall your oven racks (after you've cleaned them separately, of course!).
The video linked earlier also provides a good demonstration of the post-cleaning wipe-down, showing just how easy it is to remove the ash once the cycle is finished.
Common Self-Cleaning Problems & When to Call a Pro
While self-cleaning ovens are incredibly convenient, sometimes issues can arise:
- Door Won't Unlock: This is often due to a faulty door lock mechanism or a temperature sensor issue preventing the oven from registering as "cool" enough to unlock.
- Excessive Smoke/Fire: If you experience excessive smoke that doesn't dissipate with ventilation, or if you see flames, immediately turn off the oven and consult your user manual or a professional. This usually indicates too much loose grease was left inside.
- Oven Not Heating After Cycle: A self-cleaning cycle puts a lot of stress on oven components. Sometimes a fuse, thermal cutoff, or heating element can fail due to the extreme temperatures.
If you encounter any of these issues or if your oven's self-cleaning function isn't working as it should, it's best to call a qualified appliance repair technician. Attempting DIY repairs on high-voltage appliances can be dangerous and may void your warranty.
Conclusion: Embrace the Clean!
Your oven's self-cleaning feature is a fantastic tool for maintaining a sparkling clean kitchen with minimal effort. By understanding how it works, following the proper preparation steps, and knowing when to call for professional help, you can enjoy a fresh, clean oven without the back-breaking scrubbing. Regular use of the self-clean function (every 3-6 months for average use) can also help extend the life of your appliance by preventing excessive grease buildup.