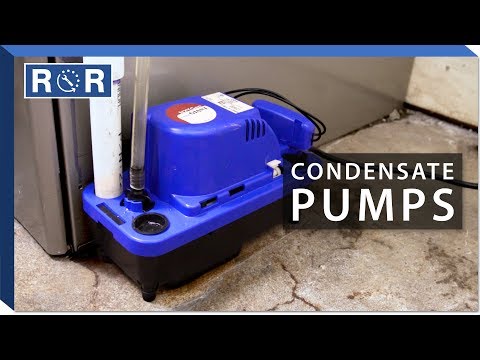
Condensate Pump Replacement & Troubleshooting
Why Your HVAC System Relies on a Condensate Pump
During the hot summer months, your air conditioner works overtime to cool your home, pulling moisture out of the air in the process. In the winter, high-efficiency condensing furnaces produce moisture as they heat your home. All of this moisture has to go somewhere. If your HVAC system is located in a basement or crawlspace without a nearby floor drain, it relies on a small but critical component to do the heavy lifting: the condensate pump.
A condensate pump collects the wastewater produced by your HVAC system or dehumidifier and pumps it safely out of your home through a discharge line. When this pump fails, water can quickly back up, leading to flooded basements, ruined drywall, mold growth, or an HVAC system that shuts down completely. Understanding how to troubleshoot and replace a failing condensate pump is an essential skill for any homeowner looking to avoid costly water damage repairs.
Common Signs Your Condensate Pump is Failing
Condensate pumps generally run quietly in the background, meaning many homeowners don't notice them until something goes wrong. Keep an eye out for these warning signs that your pump is on its last legs:
- Water Pooling Around the Unit: If you notice puddles of water around your furnace, air handler, or dehumidifier, your pump's reservoir may be overflowing.
- Unusual Noises: While some humming is normal when the pump runs, loud grinding, squealing, or vibrating noises indicate a failing motor or a jammed impeller.
- The Pump Runs Constantly: If the pump is running continuously without emptying the reservoir, there may be a clog in the discharge line, or the internal check valve may be broken.
- The HVAC System Shuts Off: Most modern condensate pumps are wired with a safety overflow switch. If the pump fails and water rises too high, this switch cuts power to your HVAC system to prevent a flood. If your AC suddenly stops running and won't turn back on, the condensate pump could be the culprit.
Step-by-Step Condensate Pump Troubleshooting
Before purchasing a replacement pump, it is worth spending a few minutes troubleshooting the unit. Some common issues can be resolved with quick maintenance rather than a full replacement.
1. Check the Power Supply: Ensure the pump is securely plugged into a working electrical outlet. Check your home's main electrical panel to make sure the circuit breaker hasn't tripped. If the outlet is a GFCI, press the reset button.
2. Test the Float Switch: Unplug the pump, remove the top cover, and inspect the float mechanism. This is usually a plastic cylinder that floats on the water. If it is stuck due to dirt, algae, or mineral buildup, gently clean it and verify that it moves freely up and down.
3. Clear the Drain Lines: Algae and mold thrive in warm, damp condensate lines. If the drain lines are clogged, the pump cannot push water out. Disconnect the vinyl discharge tubing and blow through it or use a wet/dry vacuum to clear out any blockages.
4. Clean the Reservoir Tank: Sediment and slime can accumulate at the bottom of the tank, clogging the pump intake. Flush the tank with warm water and a small amount of mild dish soap or distilled white vinegar to clear out debris.
How to Replace a Condensate Pump: A Simple DIY Guide
If troubleshooting reveals a dead motor or a cracked reservoir, replacing the pump is your best option. Fortunately, replacing a condensate pump is a straightforward DIY project that requires only basic tools and about 30 minutes of your time. To see a visual demonstration of this repair, check out this helpful step-by-step condensate pump replacement video.
To replace your pump, follow these steps:
Step 1: Turn Off the Power. Safety is always the priority. Unplug the old condensate pump from the wall outlet. If your pump is hardwired, shut off the appropriate breaker at your main electrical panel.
Step 2: Disconnect the Lines. Carefully pull the PVC drain pipes out of the pump's inlet holes. Next, disconnect the flexible vinyl discharge tubing from the brass or plastic check valve on the pump. Keep a towel or bucket handy, as some residual water may drain out of these lines.
Step 3: Disconnect the Safety Switch Wires (If Applicable). If your pump is connected to your HVAC system's low-voltage safety circuit, locate the two thin wires connecting the pump to the furnace or AC. Disconnect these wires, noting how they were connected (usually spliced with wire nuts).
Step 4: Mount the New Pump. Remove the old pump and set the new one in its place. If your old pump was mounted to a wall, line up the new pump with the existing mounting brackets or screw holes, ensuring it is level.
Step 5: Reconnect the Lines and Safety Switch. Insert the PVC drain pipes back into the inlet ports on top of the new pump. Slide the vinyl discharge tubing onto the new pump's check valve and secure it with a hose clamp. If you have safety switch wires, strip the ends of the wires on the new pump and connect them to the HVAC safety circuit using wire nuts.
Step 6: Test Your Work. Plug the new pump into the outlet. To test the system, slowly pour water directly into one of the open inlet ports on the pump. Once the water level rises high enough, the float switch should click, the motor should kick on, and the water should quickly pump out of the reservoir. Check all connections for leaks.
Preventing Future Condensate Pump Failures
Once your new condensate pump is installed, a little preventative maintenance will ensure it lasts for years to come. Once or twice a year, pour a cup of distilled white vinegar or a specialized HVAC condensate pan treatment tablet down your drain line. This simple step kills algae, prevents slime buildup, and keeps your lines flowing freely, protecting your home from unexpected water damage.